Step-by-Step Guide of Installing and Configuring CAPEv2 Sandbox on Ubuntu 22.04 [Part 1]
Despite scouring various documentation sources, including the official CAPEv2 documentation, I found a noticeable lack of straightforward guides on setting up the CAPEv2 sandbox. Realizing the potential difficulty others may face, I decided to create this detailed guide to help anyone looking to configure the CAPEv2 sandbox locally. For this setup, I am using Ubuntu 22.04 LTS and Windows 10 22H2 on a machine equipped with 32 GB of RAM, 200 GB of hard drive space, and 8 CPU cores.
Special thanks to the invaluable resource provided by rebaker501 on GitHub, which guided the initial steps of this installation. Their detailed, step-by-step breakdown was instrumental in kickstarting this setup process.
What is CAPEv2?
CAPEv2 is an open-source automated malware analysis system building upon the legacy of the original Cuckoo Sandbox, CAPEv2 introduces enhanced functionalities specifically designed to unpack, detect, and analyze complex malware. This tool extends the capabilities of traditional sandboxes by not just executing and observing malware behavior, but also by understanding anti-analysis techniques and decrypting encrypted payloads. Its dynamic analysis approach helps security researchers and analysts capture advanced details about malware, such as API calls, memory dumps, and network traffic, in a controlled environment.
Installing Ubuntu 22.04 LTS
Before diving into the complexity of CAPEv2, let’s start with the fundamental step of setting up Ubuntu 22.04 on our machine. For this installation, ensure the system meets the following specifications:
- RAM: 32 GB (or 24 GB)
- CPU Cores: 8
- Disk Size: 200 GB
Step-by-Step Installation Guide
- Installation Type: During the Ubuntu installation process, opt for a ‘Minimal Install’. This choice installs only essential software and utilities, keeping our system lean for more specific tasks later on.

2. Disk Formatting: I recommend using the entire disk for Ubuntu, which will completely overwrite any existing operating system on the device. This ensures a clean environment, minimizing potential conflicts or legacy issues.
3. Setting User and Machine Names: When prompted to choose a machine name and create a user, consider using ‘cape’ as username for consistency with the CAPEv2 environment. As for the machine name, feel free to choose any name.

sudo apt update && sudo apt upgrade -y && sudo reboot
Setting up KVM
Before proceeding with the CAPEv2 installation, there are several packages we need to install that are essential for building and running the environment effectively. These include development tools, libraries, and some utilities that may enhance our workflow.
sudo apt-get install -y git build-essential cmake ninja-build python3-dev cython3 pybind11-dev python3-pip libre2-dev acpica-tools net-tools gperf dbus-x11
Once we’ve installed the necessary packages, the next step is to set up our virtual machine environment using KVM (Kernel-based Virtual Machine). This requires downloading a script that simplifies the installation of KVM and related tools.
wget https://raw.githubusercontent.com/doomedraven/Tools/master/Virtualization/kvm-qemu.sh
To configure the kvm-qemu.sh script accurately, it's essential to include specific hardware information that aligns with our system's configuration. This ensures that the virtualization environment is optimized for performance:
- Create a Temporary Directory: First, create a new directory where we can safely work with the ACPI (Advanced Configuration and Power Interface) data without cluttering other areas of our system:
mkdir temp && cd temp
2. Dump ACPI Data: Next, use the acpidump tool to output the ACPI data from the system to a file. This data contains important information about the hardware that is utilized during the configuration of the virtual environment:
sudo acpidump > acpidump.out
3. Extract ACPI Tables: After dumping the ACPI data, extract the tables using acpixtract. This step isolates the various components of the ACPI into separate files, which are easier to analyze:
sudo acpixtract -a acpidump.out
Now Multiple files are extracted, including one particularly important file, dsdt.dat, which contains the Differentiated System Description Table, a key component for system hardware information.
4. Decompile DSDT Data: Finally, decompile the dsdt.dat file to a more readable form using iasl, the ACPI Source Language compiler/decompiler:
sudo iasl -d dsdt.dat
This command converts the binary .dat file into a .dsl file, which is human-readable and can be edited if necessary.

Now that we’ve prepared all necessary hardware data, it’s time to update our kvm-qemu.sh script to reflect this information by using powerful command-line tool called ‘sed’:
cd ..
sed -i ‘s/<WOOT>/BXPC/g’ kvm-qemu.sh
Once the modifications are made to the kvm-qemu.sh script, the next step is to set the file as executable.
sudo chmod +x kvm-qemu.sh
Now run the following command to start the installation process. This command also logs the output to a file, allowing us to review the installation details later:
sudo ./kvm-qemu.sh all cape | tee kvm-qemu.log
After setting up KVM, it’s useful to have a graphical interface for managing our virtual machines. Virt-Manager (Virtual Machine Manager) provides a user-friendly GUI for this purpose.
Following command performs the installation of Virt-Manager specifically for managing virtual environments. The output is also logged to kvm-qemu-virtmanager.log for our records.
sudo ./kvm-qemu.sh virtmanager cape | tee kvm-qemu-virtmanager.log
After the installations are complete, it’s important to reboot our system to ensure all changes take effect and all services start properly.
sudo reboot
Installing CAPEv2 Sandbox
Now, let’s proceed with CAPEv2 installation, installing CAPEv2 requires modifying the installation script slightly to fit our environment. Navigate to Home Directory:
cd ~
Clone the latest version of CAPEv2 from its official GitHub repository:
git clone https://github.com/kevoreilly/CAPEv2.git
Change to the installer directory within the cloned repository:
cd CAPEv2/installer
Run the ifconfig command and check the virtual interface and it’s IP address

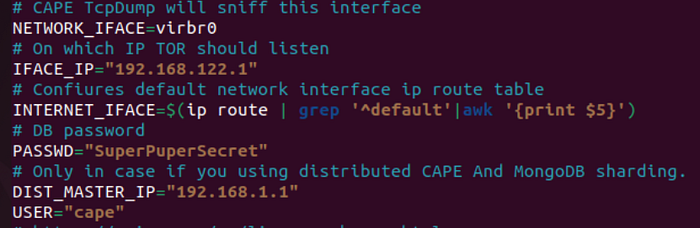
Now open the cape2.sh script, we’ll need to verify and edit some parameters to match our setup:
NETWORK_IFACE=virbr0— Ensure this matches your virtual network interface.IFACE_IP="192.168.122.1"— This should be the IP of your virtual interface.PASSWD="typeyourpasswordhere"— Set a secure password.USER=cape— Default user for the CAPEv2 sandbox.
Once the modifications are made to the cape2.sh script, the next step is to set the file as executable.
sudo chmod +x cape2.sh
Now run the following command to start the installation process with its output in log file
sudo ./cape2.sh base | tee cape.log
After the installation is complete, reboot the system again to ensure all changes take effect and all services start properly.
sudo reboot
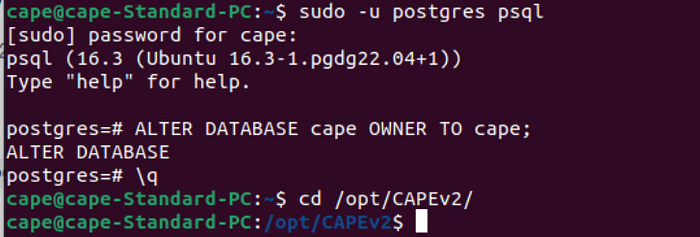
After the system restarts, we’ll need to make some final adjustments to the database and inspect the CAPE service logs to ensure everything is running as expected.
sudo -u postgres psql
ALTER DATABASE cape OWNER TO cape;
\q
cd /opt/CAPEv2
To view the logs for the CAPE service, which can provide insights into any issues encountered during startup, use:
sudo journalctl -u cape.service
Depending on what the logs reveal, we may need to install additional Python packages. For instance, in my case dependencies like peepdf, batch_deobfuscator, or httpreplay are missing, install them using Poetry to manage the Python environment and dependencies:

Install peepdf:
poetry run pip3 install https://github.com/CAPESandbox/peepdf/archive/20eda78d7d77fc5b3b652ffc2d8a5b0af796e3dd.zip#egg=peepdf==0.4.2
Install batch_deobfuscator:
poetry run pip3 install -U git+https://github.com/DissectMalware/batch_deobfuscator
Install httpreplay:
poetry run pip3 install -U git+https://github.com/CAPESandbox/httpreplay
These steps ensure that our CAPEv2 sandbox is not only installed but also properly configured and fully operational. Resolving these initial issues will lay a solid foundation for our malware analysis work, allowing us to enable additional features and further customize the environment as needed.
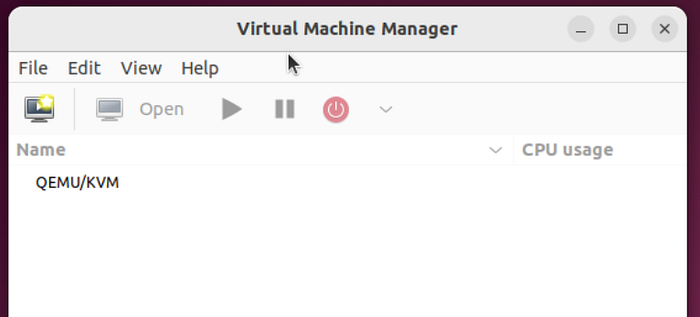
Verifying Virt-Manager Installation for Windows Setup
Open your applications menu and look for Virt-Manager. If the installation was successful, you should see the Virtual Machine Manager icon.
In the next part, we’ll dive deep into installing and configuring a Windows machine within Virt-Manager.