Step-by-Step Guide of Installing and Configuring CAPEv2 Sandbox on Ubuntu 22.04 [Part 2]
Preparing Ubuntu with Essential Software Before Installing Windows
Before diving into the installation of a Windows virtual machine, I recommend downloading few software for windows on Ubuntu host which we will transfer on windows machine after installation. Here are the tools I find essential:
Additionally, ensure to copy the agent.py file from the /opt/CAPEv2/agent/ directory to the same location where the above files are stored.
Installing Windows on Virt-Manager
- Disconnect from the Internet: Before we begin the installation, we will disconnect the Ubuntu machine from the internet. Otherwise, we can also detach the network while setting up the virtual machine in Virt-Manager to ensure that the Windows VM will not have internet access during installation.
- Launch Virt-Manager and Create New Virtual Machine: Open Virt-Manager, then click on “Create New Virtual Machine.” This starts the process to set up our Windows environment.
- Select Installation Media: Choose “Local install media (ISO image or CDROM)” and click “Forward.” In the next screen, click the “Browse” button, then “Browse Local” to locate and select Windows ISO image file.
- Configure the Operating System: Uncheck the “Automatically detect” option below the version selection to manually set up the operating system type. From the list, select “Microsoft Windows 10” from the version dropdown.
- Assign Resources: Allocate the desired amount of RAM and CPU cores to the virtual machine. For a balanced performance, assign at least 14 GB of RAM, 4 CPU cores and 70 GB of storage for the installation.
- Review and Finalize Installation Setup: Review all settings in the summary screen to ensure they meet our requirements. Click “Finish” to start the installation process.

Note: Remember the name (win10 in this case) as we will use this name in our CAPE configuration later on.
Once click “Finish,” Virt-Manager will begin installing the Windows operating system on the virtual machine. Complete the installation by selecting your preferred language, accepting the license terms, and other initial configurations. Choose a custom install and allocate the entire drive for the installation and do not set the password. Once these selections are made, the installation will continue automatically for a while.
Configuring Windows 10
Disable Windows Defender Settings:
- In the Windows search bar, type “virus” and select Virus & threat protection settings.
- Click Manage settings under the Virus & threat protection settings section.
- Turn off Real-time protection, Cloud-delivered protection, and Automatic sample submission. This is necessary to run certain tools without interference.
Set Up a Simple Server on Ubuntu:
- open a terminal in Ubuntu where all the necessary software files are stored.
- Run the following command to start a simple HTTP server:
python3 -m http.server 8080
Download Software on Windows 10:
- Open Microsoft Edge on your Windows 10 VM and navigate to
http://192.168.122.1:8080 - Download all previous software to this machine from ubuntu.
Run Defender Remover:
- Right-click the Defender Remover
.exefile and select Run as Administrator. - In the command window that appears, type
Yto confirm the removal of Windows Defender and pressEnter. Confirm again with anotherY. The tool will remove Defender, and your VM will reboot.
Post-Reboot Configuration
Stop and Disable Windows Update Service:
- Type “services” in the Windows search bar and open the Services application.
- Scroll to find Windows Update, double-click it, and click Stop to halt any ongoing updates.
- Set the Startup type to Disabled to prevent future updates from occurring automatically by clicking on properties.
Remove Update and Defender Tasks:
- Open Task Scheduler and navigate to the Microsoft folder.
- Look for folders related to Windows Update inside Windows.
- Delete all tasks within these folders to ensure they do not re-enable services or settings you have disabled.
Install Adobe Acrobat:
- Run the exe and complete the installation
Install Java Runtime Environment (JRE):
- Run the exe and complete the installation
Install Python for Windows:
- Download the 32-bit version of Python for Windows. Ensure you select the installer that allows customization.
- Check the box to Add Python to PATH and select Install Now.
- Ensure all components are selected, including Install for all users.
- Proceed with the installation.
Reconnecting to the Internet and Installing Python Packages:
- Connect Ubuntu to the Internet: Ensure your base Ubuntu system (hosting the virtual machine) is connected to the internet. You can reconnect the Ethernet cable, re-enable Wi-Fi, or adjust network settings as necessary.
- Enable Internet Access on the Windows VM: After ensuring Ubuntu is online, the internet access should propagate to your Windows virtual machine if it’s set up to share the host’s connection.
- In the Administrator Command Prompt, execute the following command to update Python’s package installer, pip:
python -m pip install — upgrade pip
- After upgrading pip, install Pillow, a powerful library for image processing in Python, by running:
python -m pip install — upgrade Pillow
Configure PowerShell:
- Open an Administrator PowerShell session.
- Type
Set-ExecutionPolicy Unrestrictedand hitEnter. Confirm by typingAfor all. - Enter
netsh interface teredo set state disabledand pressEnter.
Adjust Group Policies:
- Start
gpedit.mscfrom the PowerShell window. - Navigate to Computer Configuration > Administrative Templates > Network > DNS Client, and open Turn off Multicast Name Resolution. Enable it.
- Go to Computer Configuration > Administrative Templates > System > Internet Communication Management, and open Restrict Internet Communication. Enable this setting to further reduce system noise.
Run Debloat Scripts:
- In the PowerShell, navigate to the directory containing the Debloat Scripts.
- Run the following command to unblock all scripts:
ls -Recurse *.ps*1 | Unblock-File
- Execute the scripts one by one:
disable-services.ps1,block-telemetry.ps1,remove-default-apps.ps1,remove-onedrive.ps1. Then move to the utils directory and rundisable-scheduled-tasks.ps1.
Configuring the Network in Virt-Manager
- Open your Virtual Machine Manager (Virt-Manager), and select Edit. Then, choose Virtual Network to modify the network settings.
- Click on Stop network to halt the existing network settings.
- Choose to Delete the current NAT network to remove any pre-configured network setups that may not suit your testing environment.
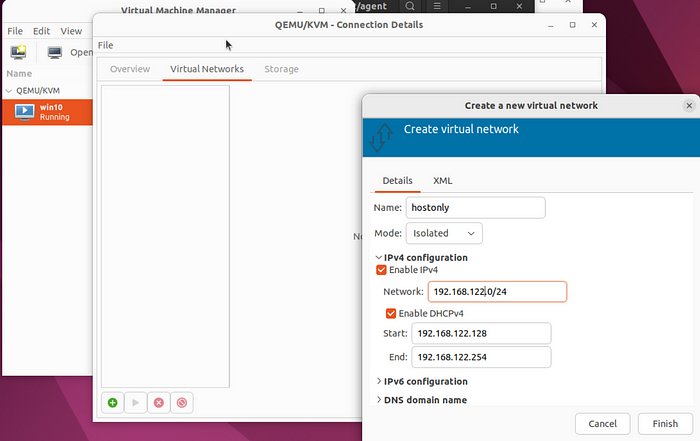
- Click on the Add Network button to initiate the creation of a new network.
- Set the network’s name to
hostonly. - Change the Mode to Isolated to ensure that this network does not have external internet access, which is crucial for a controlled environment.
- Under IPv4 Configuration, set the IP range to
192.168.122.0/24. This configuration will serve as the subnet for your VMs to communicate if needed.
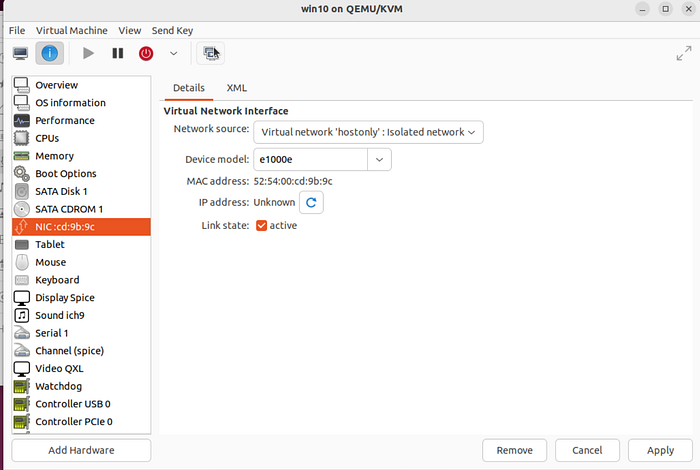
- Back in the main Virt-Manager window, go to your Windows machine’s settings and select Show hardware details.
- Find the Network Interface Card (NIC) settings and make sure the Network Source is set to
isolated. - Click on Apply to save the changes.
Setting a Static IP in Windows:
- On your Windows VM, navigate to the Control Panel -> Network and Internet -> Network and Sharing Center.
- Click on Ethernet to access the network properties.
- In the Ethernet Status window, click on Properties.
- Double-click on Internet Protocol Version 4 (TCP/IPv4).
- Select the option to use the following IP address and assign a static IP as mentioned in figure below.

- After entering all the necessary IP information, click OK to save the settings and close all windows by clicking Exit.
Creating and Configuring a Basic Task in Task Scheduler:
- Type “Task Scheduler” in the Windows search bar and open it.
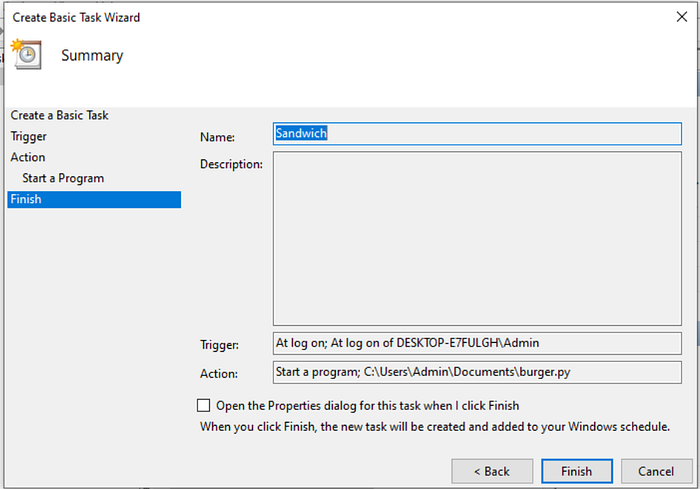
- In the Task Scheduler library, click on “Create Basic Task…” to start the wizard.
- Name the task. For example, let’s name it “sandwich”.
- Click Next to continue.
- Choose the trigger for the task. Select “When I log on” to have the task execute every time you log into Windows.
- Click Next.
- For the action, select “Start a program”.
- Click Next.
- Click Browse to locate and select the
agent.py(burger.py in my case) script that you previously transferred from your Ubuntu host. - After selecting the file, click Next.
- Review the task settings to make sure everything is correct.
- Click Finish to create the task.
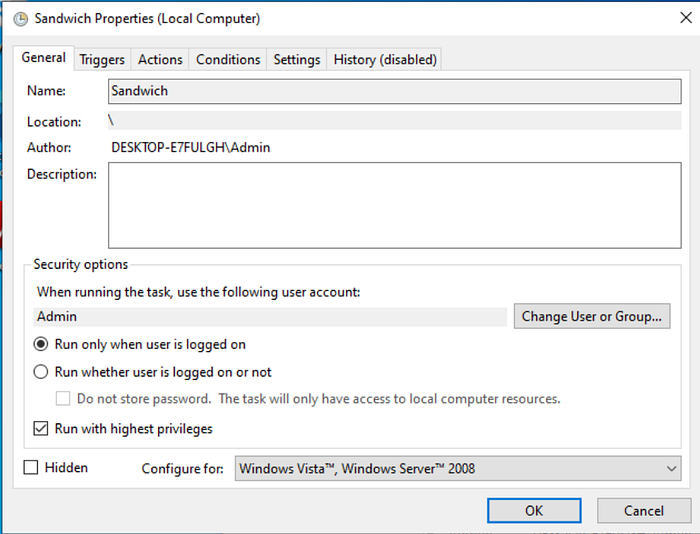
- In the Task Scheduler library, find the “sandwich” task you just created. Double-click on it to open its properties.
- In the task properties, check the option “Run with highest privileges” to ensure the script has the necessary permissions to execute properly.
- Click OK to save the changes.
- Click the Start button, click on your user icon, and choose “Sign out”.
- Log back into Windows. This action triggers the Task Scheduler to run the “sandwich” task you created, starting the
agent.pyscript automatically. - Use the
curlcommand to interact with the Python agent running on the Windows VM from Ubuntu host.

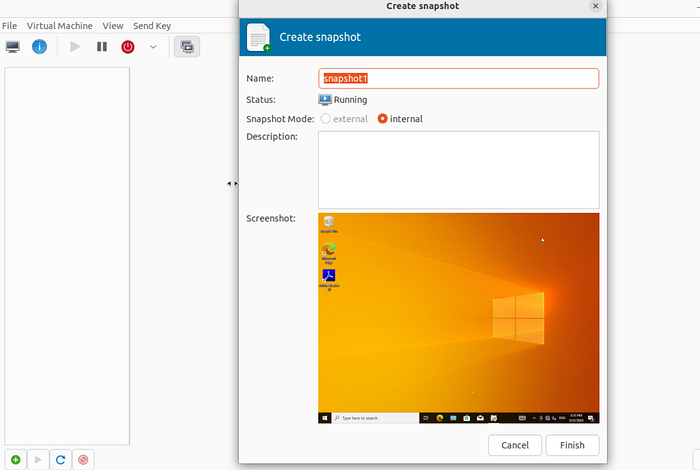
Creating a Snapshot of the Windows VM:
- Open Virt-Manager and select the Windows virtual machine.
- Navigate to View in the menu bar, then select Snapshots from the dropdown menu.
- In the snapshots window, click on Create a new snapshot.
- Name the snapshot. For clarity and future reference, let’s name it “snapshot1”.
- Click Finish to create the snapshot.
Configuring CAPE Settings
Edit the cuckoo.conf File:
Navigate to the configuration directory of CAPEv2 by opening a terminal and entering:
cd /opt/CAPEv2/conf/
Open the cuckoo.conf file with nano or your preferred text editor:
- Locate the
[resultserver]section and change the IP address to192.168.122.1to match the network configuration of your analysis environment. - In the
[database]section, verify the connection details such as the database type, name, and password. Ensure these details match what you set up during the initial configuration of CAPE. - Save the changes and exit the editor.
Edit the kvm.conf File:
Still in the /opt/CAPEv2/conf/ directory, open the kvm.conf file:
Change the machines line to match the name of your virtual machine as configured in KVM, for example: machines = win10
Confirm the interface is set to virbr0, which should match your current network interface configuration (you can verify this by running ifconfig in the terminal).
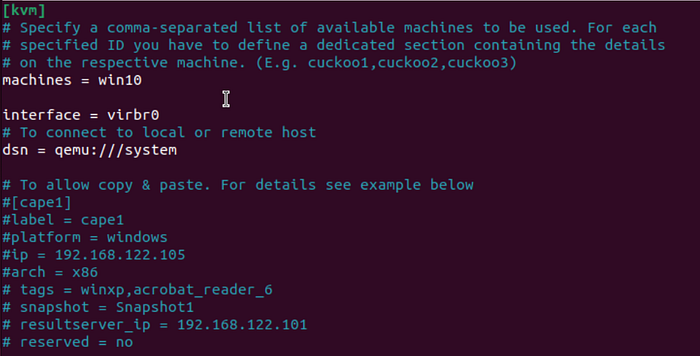
Set the rest of the configuration according to your specific needs. This includes setting the virtual machine’s name, static IP (which you configured in Windows), snapshot name (as you set in Virt-Manager), the result server’s port, and the architecture (x64 in this case). These details should match exactly to ensure smooth communication and functionality.
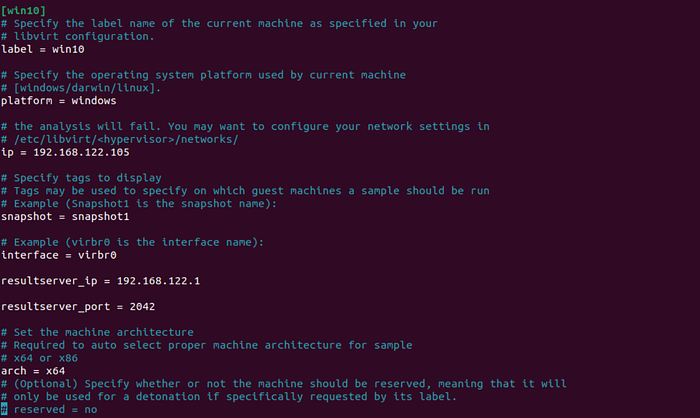
Save the file and exit the editor.
Restart All CAPE Services:
sudo systemctl restart cape*
Navigate to the Utility Directory
cd /opt/CAPEv2/utils/
Execute the rooter.py script with appropriate permissions to allow CAPE to manage the network traffic:
sudo python3 rooter.py -g cape

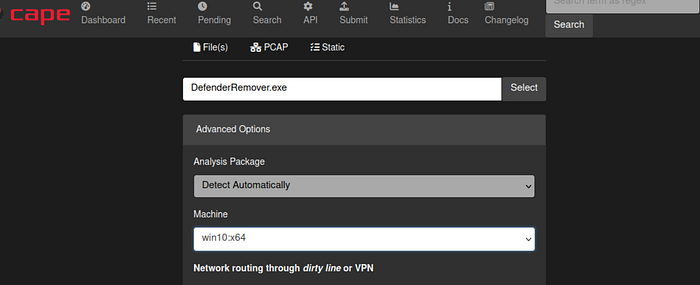
Accessing CAPE Sandbox
With these steps completed, your CAPE sandbox is now fully configured and ready for use:
- Access CAPE Interface: You can now access the CAPE web interface by navigating to
http://<your-host-ip>:8000in your web browser. This interface allows you to manage and interact with the sandbox, submit malware samples, and review analysis results. - Submit Samples: To start analyzing malware, submit any suspicious file or URL through the web interface.
Conclusion
Congratulations on successfully setting up and configuring your CAPE sandbox environment. With these tools, you’re now equipped to conduct detailed malware analysis safely and efficiently. The ability to inspect, analyze, and understand malware behavior in a controlled and isolated environment is crucial for developing stronger security measures and responses.